Forecasts and Schedules
Implemented into the eELib is a possibility to calculate a forecast and schedule for devices, EMSs, and the grid. For this, a forecast model is given to calculate requested forecasts. Additionally, the calculation of schedules can be implemented in each (control) model.
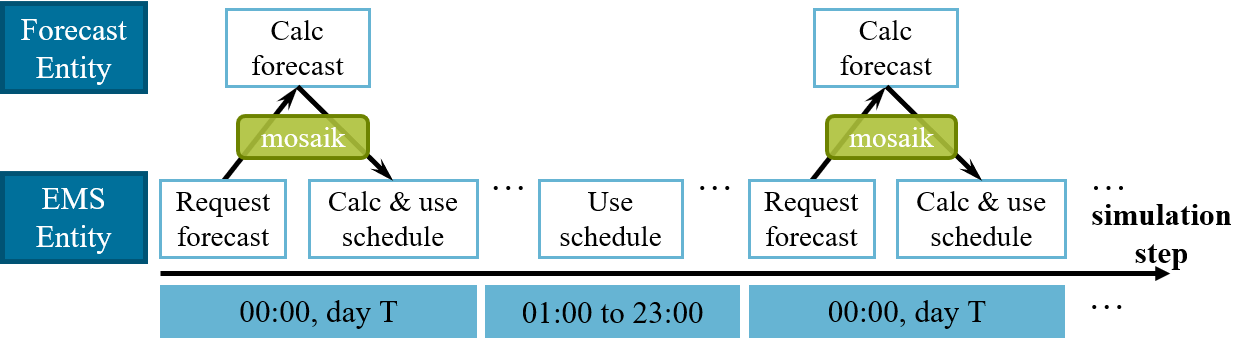
Use of the forecast model in the eELib within simulations.
Integration into Scenario
Forecasts and schedules can be integrated into simulations like the
examples/test_scenario_***.py files examplarily show. In there, one has to declare the forecast
simulator to mosaik via the SIM_CONFIG. Additionally, one has to set the parameter
USE_FORECAST in the scenario configuration to true.
43# Sim config.: Simulators and their used model types with the properties to store into DB
44SIM_CONFIG = {
45   # used database, will be left out for model creation and connections
46   "DBSim": {"python": "eelib.data.database.hdf5:Hdf5Database"},
47   # forecast, will be left out for model creation and connections
48   "ForecastSim": {
49      "python": "eelib.core.control.forecast.forecast_simulator:Sim",
50      "models": {"Forecast": []},
51   },
93# Configuration of scenario: time and granularity
94START = "2020-01-01 00:00:00"
95END = "2020-01-04 00:00:00"
96STEP_SIZE_IN_SECONDS = 900  # 1=sec-steps, 3600=hour-steps, 900=15min-steps, 600=10min-steps
97USE_FORECAST = True
After this, the forecast simulator and model will be created, and the connections to the models will be instantiated.
Forecast Model
The forecast model and its simulator are implemented in the folder eelib/core/control/forecast.
The implemented behaviour is quite simple and straight-forward, as all model entities of the
simulation are stored within the forecast entity (as deep-copies) via the
add_forecasted_entity() method. This allows to create forecasts by simply iterating over all
requested forecasts for all entities, stepping the model for the requested timesteps, and collecting
the values (of the model entity) for the requested timesteps.
After that, the forecast model simply returns those calculated forecasts.
64# check if request for a forecast was sent
65if self.forecast_request == {}:
66   self.forecast = {}  # no forecast requested, simply return
67else:
68   # clear earlier forecasts
69   self.forecast = {}
70
71   # go by all entities to create a forecast for
72   for forecast_getter_id, forecast_req_eid_dict in self.forecast_request.items():
73      # create empty dict for forecasts connected to this request entity
74      self.forecast[forecast_getter_id] = {}
75      # check if no forecast requested
76      if forecast_req_eid_dict == {}:
77         continue
78
79      # go by all forecasted model entities
80      for forecast_eid, forecast_info in forecast_req_eid_dict.items():
81         # check if forecast can be done for this model type
82         if forecast_eid in self.forecast_eid.keys():
83            # create structure for forecast of each attribute for this entity
84            forecast_save = {}
85            for attr in forecast_info["attr"]:
86               forecast_save[attr] = []
87
88            # store the copy of this model entity to execute the stepping
89            entity = self.forecast_eid[forecast_eid]
90
91            # run the model for each timestep and collect the calculated attr values
92            for t in forecast_info["t"]:
93               entity.step(t)
94               for attr in forecast_info["attr"]:
95                  forecast_save[attr].append(getattr(entity, attr))
Integration into (Control) Models
For the forecast model to take effect, the forecasts have to be requested by other models, e.g. the energy management system. Additionally, the calculated forecasts should afterwards be used for strategic behaviour (in operating strategies).
First of all, the mosaik needs to create a connection between the model and the forecast model. This
is done in the connect_to_forecast() function of the simulation helpers. Here, there is a
connection added from EMS to the forecast model for the forecast_request attribute, while a
forecast attribute is send back the other way around.
All other models are simply added to the forecast entity such that forecasts can be calculated.
Additionally, forecasts have to be requested by the entities that try to work with forecasts, i.e. the HEMS. This request should be made only during the corresponding timesteps.
340# request forecasts if needed
341if self.use_forecast and self.calc_forecast:
342   self.forecast_request = {}
343   for model_type, entity_list in self.contr_fullid_list_by_type.items():
344      if model_type in self.forecasted_attrs.keys():
345         # add forecast request for every entity of this model type
346         for e_full_id in entity_list.keys():
347            self.forecast_request[e_full_id] = {
348               "attr": self.forecasted_attrs[model_type],
349               "t": range(self.forecast_start, self.forecast_end),
350            }
Due to the connection by mosaik, the forecasts are calculated and afterward send back, such that
they should be processed. It is now also possible to calculate schedules with set values for the
devices from which no forecast can be directly extracted, e.g., charging station, heatpump, battery.
This behaviour is quite complicated, as the HEMS does not recieve forecast resp. schedule time series
from the devices but rather tries to reproduce the behaviour of the devices in own methods. To do
this, a functionality within the HEMS has to exist, e.g. the method hp_calc_schedule() to
calculate a schedule for the heat pump using the thermal demand forecast.
352# CALC SCHEDULE WITH UNCONTROLLED (CSV) DEVICES
353if self.forecast != {} and self.calc_forecast is True:
354   # calculate the residual load schedule including all not controllable devices
355   schedule_residual_uncontrollable = schedule_help.residual_calc_schedule_uncontrollable(...)
356
357   # calc schedules for charging station
358   schedule_help.cs_calc_schedule_uncontrolled(...)
359
360   # calc schedules for heatpump
361   th_residual_forecast = schedule_help.thermal_calc_forecast_residual(...)
362   schedule_help.hp_calc_schedule(...)
363
364   # get schedule from battery storage based on residual load schedule
365   schedule_help.bss_calc_schedule(...)
Minimum example
This minimum example intends to provide an easy introduction on how forecasts are used. For this, we take a HEMS model and a CSV reader model.
First, the two models should be connected in the attribute that is intended to be forecasted. So if a forecast should be done for the active power value of the CSV reader, the models should be connected in the “p”-value.
Additionally, the HEMS model has to be connected to the forecast model to request and recieve forecasts. This should be in the attributes “forecast_request” und “forecast”. In the test scenarios, this is done in the simulation helper functions. For those to work, the HEMS model has to have properties with these exact names.
Now the simulation can be started with the
world.run()command, as seen in the test scenarios.During the simulation the HEMS can start a request to the forecast model, e.g.
self.forecast_request = {"CSVReader_0": {"attr": "p", "t": range(0, 96)}}. The dict contains the name of the model that should be forecasted, and the values in that dict key are the attributes to be forecasted and the time horizon of the simulated time steps. Here, we intend to forecast the power for the first 96 timesteps (full day of 15min-steps).This forecast request is sent by mosaik to the forecast model. Here, the forecast will be calculated with a copy of the model by stepping this model for the desired timesteps.
Afterwards, the calculated forecast will be sent back to the HEMS by mosaik and can be then used to calculate schedules for other devices like the battery storage system.